Mmm…so air dry clay. Air dry clay is just one of those things I remember playing with as a child (usually the brown coloured one), but I can’t think of any recent experiences with it. That’s until I spotted a few interesting pins on Pinterest that caught my attention. I decided that it was definitely worth give this medium a try, but was’t interested in investing in expensive equipment, but rather using tools I already had in my possession.
I went through lots and lots of pins and tutorials, trying to figure out which appealed most – both aesthetically and technically speaking, and decided to try making three objects I could also find a practical element in preparing them- a trinket/jewelry bowl (desperately needed for organizing rings), a clay coaster (always need some of those), and a pair of clay earrings.
First, I picked up a packet of 500 g Das Air Clay.

I placed a small plastic bowl next to the clay, where I could wet my fingers before picking up a piece of clay.
I then rolled a piece of clay until it was about 3 mm- 4mm thick. Since clay tends to pick up almost EVERYTHING from the surface it’s rolled on, I found a spare floor tile on our balcony that turned out to be the perfect working surface (once scrubbed clean). If you don’t have a spare tile, I’d try rolling the clay on some parchment paper attached to table with removable sticky tape. BTW- If you have a pasta machine you barely use, you can press the dough using your machine. We actually own one but my husband didn’t like the idea of finding bits of clay in his pasta (: .

First item up- the jewelry dish. I actually tried rolling a paper doily first on top of the thinned out dough, but this turned out to leave a weak trace of a pattern that was barely noticeable. I didn’t have a crochet doily on hand (which would probable fan out much better) so instead I tried pressing a plastic serving dish my mom picked up at a party store a while ago. This time a lovely pattern appeared.

I then started pinching the sides of the clay to create a small bowl. I used a damp wiping cloth and went over the clay to eliminate any unwanted dents and fingertips.
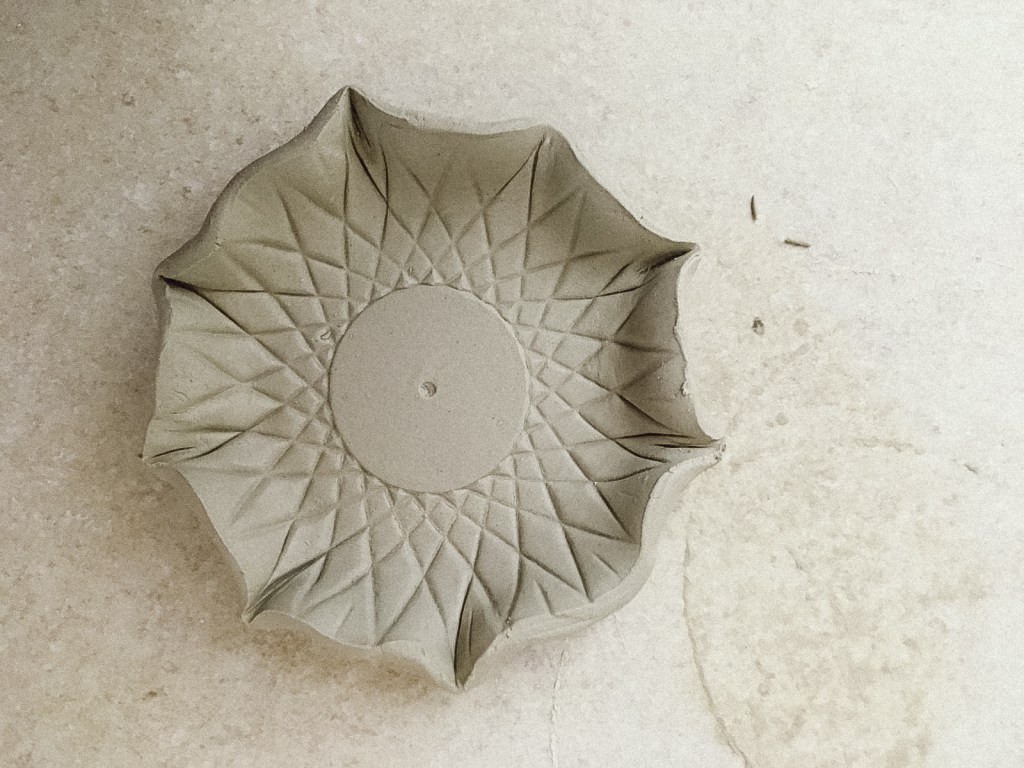
I let it dry for 24 hours (Ok, not exactly 24 hours I’m not a very patient person, maybe 16 hours (:). At this point the bowl seemed dry enough to be painted. I used some sandpaper to gently polish the bowl exterior, and then added a dab of gold paint with a marker to the edges.

After finishing the jewelry dish, I moved on to the second project – the clay coaster. I repeated the same steps again in prepping the clay – rolling a small portion of clay on the tile. I placed a dried lavender leaf (I dried the leaf between two books a few days prior), over the clay and rolled the roller to create the imprint.


I then waited for the clay to dry and again added a bit of gold paint to the patter.
Then I moved on to the last project- clay earrings. I cut out a few small circles with a small tube bead I had from a previous project (but anything round will do), and using a toothpick created small holes.


I tried painting the circles with the gold marker, but wasn’t satisfied with the final look, so I tried using some deco metal flakes and decoupage glue/varnish instead. This was my first time using metal flakes- very cool product! I’ve got to find additional uses.


I spread a thin layer of glue on the clay, then gently placed a leaf above and pressed with my fingers or small brush. I removed any excess clay with a knife.

I used a plier and some jump rings to assemble the earrings together.
Here are the three finished projects-

So the bottom line is- If you have some spare time on a weekend, air dry clay is a great medium for creating practical items you could either make for yourself or as gifts. Have a go at it yourself (:
Leave a Reply