Zaga DiyGotta Love Pinterest!2024-06-29T13:58:21Zhttps://www.zagadiy.com/feed/atom/WordPress''admin''<![CDATA[IKEA Kitchen Island Hack]]>https://www.zagadiy.com/?p=6652024-06-29T13:58:21Z2024-06-23T16:05:23ZSo I haven’t posted in a really long time, a fact that needs to be remedied immediately (: I’d like to show you a really practical and inexpensive way to…
]]>So I haven’t posted in a really long time, a fact that needs to be remedied immediately (: I’d like to show you a really practical and inexpensive way to create a small functional kitchen island.
You will need:
Kallax 4*4 77 cm* 77 cm shelving unit
Kallax Insert with door
Kallax Insert with 2 drawers
Vinnaset Door Knobs
Bagganas Handles – Optional
In addition, you’ll need – 4 round cabinet feet, 4 L-shaped metal brackets, contact paper of your liking, and one Formica laminate countertop – I bought a 60*85*16.5 cm panel online (custom made- cost about 25 US dollars).
Instructions –
First, put together the Kallax shelving unit. Next add the contact paper to the sides of the unit and the door insert. Add door knobs to the drawer inserts. Add both to the Kallax. Attach the custom countertop to the Kallax unit using L brackets. finally, flip the unit and insert the round cabinet feet. If you’d like, you can add on the sides two Bagganas handles for kitchen towels.
So, what do you think? I’d love to hear your comments!
]]>0''admin''<![CDATA[IKEA Hack- DIY Beer Bottle Dryer/Sanitizer]]>https://www.zagadiy.com/?p=6332024-06-29T05:42:54Z2021-04-11T04:24:39ZSo haven’t posted in a while, and today I wanted to share with you a little hack that has made my life a lot easier! I recently returned to brewing…
]]>So haven’t posted in a while, and today I wanted to share with you a little hack that has made my life a lot easier!
I recently returned to brewing beer. My first attempt a few years ago after attending a beer brewing workshop ago wasn’t very successful, with the bottled beer tasting like beer does but completely flat and un-carbonated. I felt pretty discouraged and didn’t touch the equipment again until last week, when I decided it’s time to get down to business and give it another try. I purchased a “make your own beer” starter kit on amazon and voilà! it seems like this time around it may actually work (: This time around I went with a 1-gallon (approx. 5 liters) carboy instead of the 5- gallon bucket (approx. 20 litters) just in case the beer turns out flat again…
Check out those bubbles! This is what the beer looked like about 24 hours after brewing
So back to our topic, I read it’s really important to properly sanitze the bottles used for the home brew, and read that the most popular way is to buy a bottle draining tree with a bottle rinser on top. However most options I looked into we’re a bit expensive and also didn’t offer a solution for storing the beer bottles before rinsing them.
That’s when I thought about the IKEA KUGGIS box – what’s great about this box is that it’s sturdy, comes in a variety of sizes, and most importantly at only $7.99 definitely a steel compared to the other bottle drying options.
The only catch is, you need to have some extra equipment at home to make this hack. It’s called a FIXA hole saw set – and it enables you to create holes in the KUGGIS plastic (this isn’t the original purpose of the product, but it definitely works).
Most of the credit here goes to my hubby who actually drilled the holes (:
Here’s what you need for a DIY beer bottle dryer/sanitizer:
KUGGIS box – I chose this one for my project but If you plan on brewing more than 1 Gallon/5 Liters go for a bigger size.
I started by measuring the Diameter of my beer bottles. According to my calculation the KUGGIS lid had place for 20 bottles since each bottle was 2.4~inches/6 cm in diameter. This was perfect since my 1 gallon carboy produces about 12 bottles of beer.
Each X marked where to place the center of the hole saw.
Next, using the smallest saw from the IKEA set ( the 1 3/8″ or 35 mm saw) my husband drilled 20 holes into the KUGGIS lid using a wooden block beneath to protect our outdoor table.
He then carefully used a utility knife to smooth the edges of the plastic holes.
I soaked 12 used beer bottles in soapy warm water for 2 hours using the KUGGIS box. The labels came right off with the help of a kitchen sponge. I then emptied the bottles and drained them through the holes.
The same process can be repeated towards bottling the beer. Just fill the KUGGIS box with sanitizing solution and empty beer bottles, and then let them drain before you fill them with home-brewed beer.
Pretty cool right? I thought this was a fun practical little project that will definitely make beer brewing a lot easier.
]]>0''admin''<![CDATA[Making Your Own Homemade Lip Balm]]>https://www.zagadiy.com/?p=6192024-06-29T05:50:46Z2020-11-14T16:45:11ZHi There! Haven’t written here in a while…today I’d like to share a really quick and fun weekend project- making your own lip balm! To make things simpler, I actually…
]]>Hi There! Haven’t written here in a while…today I’d like to share a really quick and fun weekend project- making your own lip balm!
To make things simpler, I actually purchased a lip balm container set on amazon, but you could also use just about any clean empty jars you have at home.
There are a ton of different lip balm recipes on the web, so I decided to go with the easiest one I found- https://www.elementsbathandbody.com/lip-balm-recipe/. This site is really amazing- they have so many different recipes that I want to try, not just for lip balms bit for every bath product you can imagine, and they also supply the containers and ingredients ( although I haven’t tried ordering those from them).
I ordered my oils, butters and lip flavours from different suppliers, have a look here-
I replaced Avocado Oil with Shea Butter (simply because I didn’t have any at home), checking first online which oil/butters would be a good substitute.
I started by weighing the ingredients with this handy gadget I found on AliExpress. It’s a scale for small items (up to 200g) and I found It very accurate!
I melted the ingredients over a double boiler pot (minus the flavor oils).
You can also microwave the oils in a bowl.
When they were all melted, I added the flavor oils and tipped the bowls content into the lip balm tray.
The kit also comes with printable lables which I haven’t tried yet.
All in all I’m really happy with how this lip balm turned out. It’s really moisturizing and creamy, although next time I think I’ll add more flavoring/scent oil…
]]>0''admin''<![CDATA[Experimenting with Air Dry Clay – Easy Weekend Project]]>https://www.zagadiy.com/?p=5522024-06-29T06:12:42Z2020-07-12T10:21:44ZMmm…so air dry clay. Air dry clay is just one of those things I remember playing with as a child (usually the brown coloured one), but I can’t think of…
]]>Mmm…so air dry clay. Air dry clay is just one of those things I remember playing with as a child (usually the brown coloured one), but I can’t think of any recent experiences with it. That’s until I spotted a few interesting pins on Pinterest that caught my attention. I decided that it was definitely worth give this medium a try, but was’t interested in investing in expensive equipment, but rather using tools I already had in my possession.
I went through lots and lots of pins and tutorials, trying to figure out which appealed most – both aesthetically and technically speaking, and decided to try making three objects I could also find a practical element in preparing them- a trinket/jewelry bowl (desperately needed for organizing rings), a clay coaster (always need some of those), and a pair of clay earrings.
First, I picked up a packet of 500 g Das Air Clay.
DAS Air Clay on tile
I placed a small plastic bowl next to the clay, where I could wet my fingers before picking up a piece of clay.
I then rolled a piece of clay until it was about 3 mm- 4mm thick. Since clay tends to pick up almost EVERYTHING from the surface it’s rolled on, I found a spare floor tile on our balcony that turned out to be the perfect working surface (once scrubbed clean). If you don’t have a spare tile, I’d try rolling the clay on some parchment paper attached to table with removable sticky tape. BTW- If you have a pasta machine you barely use, you can press the dough using your machine. We actually own one but my husband didn’t like the idea of finding bits of clay in his pasta (: .
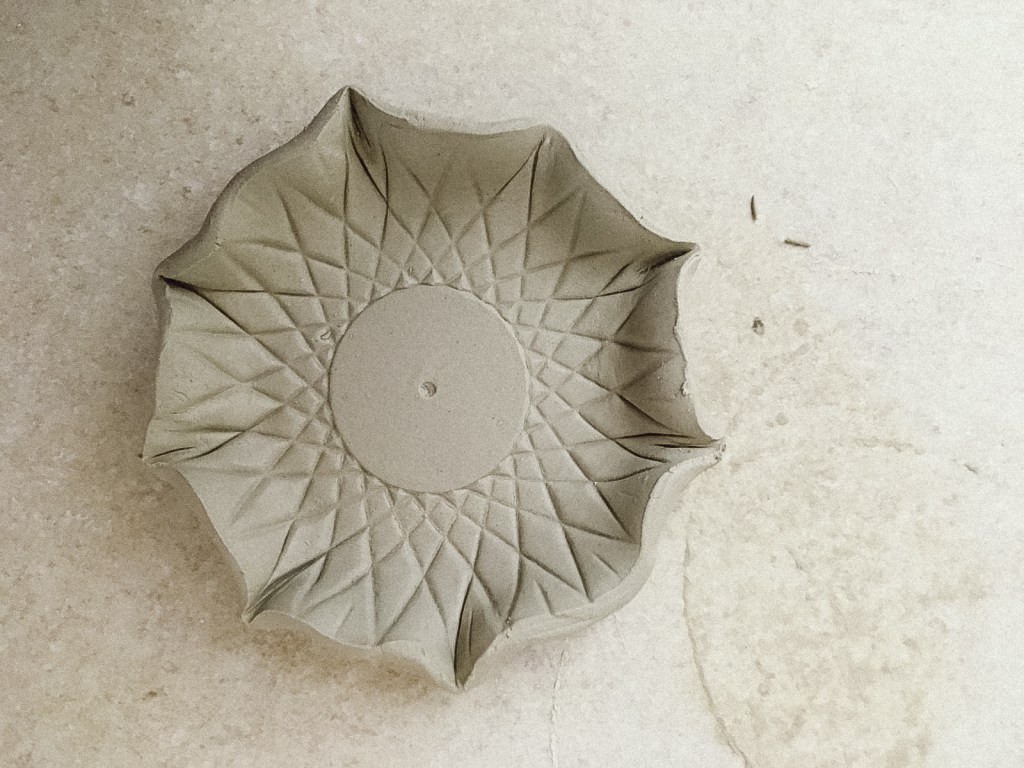
First item up- the jewelry dish. I actually tried rolling a paperdoily first on top of the thinned out dough, but this turned out to leave a weak trace of a pattern that was barely noticeable. I didn’t have a crochet doily on hand (which would probable fan out much better) so instead I tried pressing a plastic serving dish my mom picked up at a party store a while ago. This time a lovely pattern appeared.
Pressing the serving dish on top of the thinned out air clay
I then started pinching the sides of the clay to create a small bowl. I used a damp wiping cloth and went over the clay to eliminate any unwanted dents and fingertips.
I let it dry for 24 hours (Ok, not exactly 24 hours I’m not a very patient person, maybe 16 hours (:). At this point the bowl seemed dry enough to be painted. I used some sandpaper to gently polish the bowl exterior, and then added a dab of gold paint with a marker to the edges.
After finishing the jewelry dish, I moved on to the second project – the clay coaster. I repeated the same steps again in prepping the clay – rolling a small portion of clay on the tile. I placed a dried lavender leaf (I dried the leaf between two books a few days prior), over the clay and rolled the roller to create the imprint.
I then waited for the clay to dry and again added a bit of gold paint to the patter.
Then I moved on to the last project- clay earrings. I cut out a few small circles with a small tube bead I had from a previous project (but anything round will do), and using a toothpick created small holes.
Here’s what they looked like when dry.
I tried painting the circles with the gold marker, but wasn’t satisfied with the final look, so I tried using some deco metal flakes and decoupage glue/varnish instead. This was my first time using metal flakes- very cool product! I’ve got to find additional uses.
Rayher metal flakes and glue.
I spread a thin layer of glue on the clay, then gently placed a leaf above and pressed with my fingers or small brush. I removed any excess clay with a knife.
I used a plier and some jump rings to assemble the earrings together.
Here are the three finished projects-
Air clay projects left to right- jewelry bowl, clay coaster, and clay earrings.
So the bottom line is- If you have some spare time on a weekend, air dry clay is a great medium for creating practical items you could either make for yourself or as gifts. Have a go at it yourself (:
]]>0''admin''<![CDATA[Padded Fabric Ear Savers]]>https://www.zagadiy.com/?p=5032024-06-29T12:10:24Z2020-07-05T18:06:15ZSo my next post will be about ear savers! As a physician, I spend most hours of the day with a mask on my face. I find that the most…
]]>So my next post will be about ear savers! As a physician, I spend most hours of the day with a mask on my face. I find that the most difficult part with wearing a mask around the clock is the strain the elastic causes on my ears. A fellow resident – Natalie – suggested I make a crochet ear saver (there are endless options if you search the phrase on Pinterest or Youtube), but I found crocheting an ear saver was too time consuming. I went on to search for a fabric version of the ear savers, and followed several tutorials to make a few samples of fabric ear savers for myself and fellow healthcare workers. I also tried making a few samples with large elastic bands instead of fabric, but found they tended to feel a bit flimsy when trying to attach them to the mask several times a day.
I found the cotton ear savers had the nicest feel- especially when worn over many hours, , however most cotton fabrics I owned (I used a lot of leftover scrap fabric from previous projects) tended to be light – medium weight and would crinkle and not retain their original size and texture when worn repeatedly, not to mention it was hard attaching the elastic strings to the buttons on the fabric.
I then came up with the following idea to help use up my cotton fabric stash with its pretty patterns, using some basic wiping clothes you can find just about anywhere.
You will need-
Light- medium weight cotton fabric- I used scrap fabric from previous projects, ironed before used.
Wiping clothes- I picked up a packet at the local convenience store. It said on the label they were both washable and reusable.
Two colourful buttons- at least 20mm-25mm in diameter.
Thread
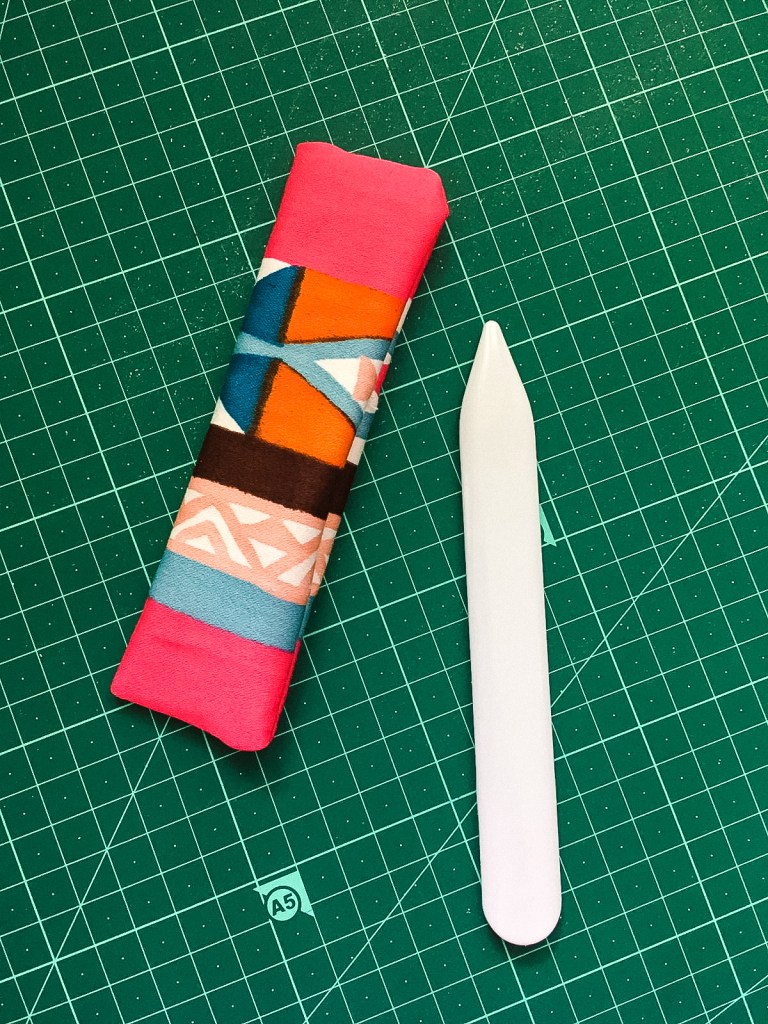
Optional- sewing machine, cutting mat, rotary cutter, point turner.
Cut a 16x10cm rectangle from the cotton fabric. I actually created a stencil and then cut around it with a rotary cutter, but using a pen and scissors would work just fine. Btw- the pink pattern weight I made following tutorials I found online, you can see an example here- https://www.craftinessisnotoptional.com/2014/01/simple-easy-pattern-weights.html
I placed a stencil I created over the fabric a laid a fabric weight to keep it steady while I cut around the stencil with a rotary cutter.
Take the cotton rectangle, fold wrong side to wrong side (the side without the print) and sew the edges together at a 10mm/1 cm seam allowance, leaving a gap of about 5 cm in the middle of the longer edge.
Blue line= gap without stitches
Turn the fabric inside out through the gap, so the pretty side is now facing you. I used a point turner to smooth out the corners.
Now cut a similar rectangle from the wiping cloth. You can use any basic absorbent cleaning cloth, look for those that are washable.
Wiping Clothes
Take the wiping cloth rectangle, fold in half, and remove 10-13mm from the edges.
Removing the edge of the folded wiping cloth
Step 4- Sew the edges of the wiping cloth together.
Insert the wiping cloth through the gap.
Topstitch the ear saver- best to stay close to the the edges so the gap closes properly. I actually should’ve stayed closer to the edges to ensure a proper seal.
Last but not least- add two buttons to each side either by hand or with a sewing machine.
Voila! Your very own padded ear saver.
Padded Ear Saver
Feel free to customise the size or materials, it’s a lot of fun experimenting!
]]>0''admin''<![CDATA[Growing Sweet Potatoes in Water]]>https://www.zagadiy.com/?p=4852024-06-29T12:15:41Z2020-04-25T06:49:31ZSo, after a short hiatus, I’m back to updating the blog! unfortunately the intensity of the residency program and the corona virus caught me (and the rest of the world)…
]]>So, after a short hiatus, I’m back to updating the blog! unfortunately the
intensity of the residency program and the corona virus caught me (and the rest
of the world) by surprise, so it took me some time to get back to all my
hobbies and find some time to update the site.
Today I’d like to share with you a really great idea for decorating windowsills that seem bland or need an extra touch of greenery without investing a lot of money or maintenance.
Remember my previous post about Making Self-Watering
Herb Jars From Cuttings? I decided to use some of the leftover plastic
planting baskets I bought from AliExpress to try and cultivate sweet potatoes,
after reading online that they grow well in water and develop beautiful green
edible leaves.
I took the same glass container and plastic planting baskets from the previous post, filled the water to the top of the jar and inserted a brown and purple sweet potato at the top. You could probably do the same without a planting basket using toothpicks to steady the potatoes, with about 1/3 of the potato submerged in water.
Within a couple of days, the potatoes start developing white roots, and within a couple of weeks lovely green leaves appear on the top. I let one of the potatoes grow wild around our windows and it looks lovely! If you’d like, you can try cutting one the vines and letting it grow on its own in water, thus eliminating the need to keep an entire potato on the windowsill.
Purple sweet potato in water- lowered the potato to the floor to photograph it but I grow it on the windowsill facing eastLook at all those roots!
Apparently if you take the sprouts and plant them, you can grow new potatoes with 14 weeks. Unfortunately, we don’t have the space on our balcony but it definitely sound exciting. I also read that the leaves are edible- haven’t tried eating them yet so I’ll keep you posted.
Read the leaves are edible- haven’t tried them yet…Brown sweet potatoPotato vines
Have you tried growing your own? How about other veggies? Let me know how it went.
]]>0''admin''<![CDATA[Glass Flower Vase- Cement Project Number 3]]>https://www.zagadiy.com/?p=4662024-06-29T12:18:31Z2019-12-06T09:17:37ZThis week I’d like to introduce another great way for incorporating cement creatively into our daily lives…this following tutorial actually uses two skills I discussed in previous posts- cutting glass…
]]>This week I’d like to introduce another great way for
incorporating cement creatively into our daily lives…this following tutorial
actually uses two skills I discussed in previous posts- cutting glass with a glass
cutter, and casting cement for home-diy purposes.
You will need:
Cement -take a quick peek at my tutorial here for using cement at home.
Used glass bottle- I cut a clear wine bottle. See instructions here.
Round plastic containers- I used two bowels that fit snuggly into one another. You need to make sure the circumference of the bottom of the bowels is identical and is slightly larger than the circumference of the glass bottle you’ll be using.
Cork sheet or any padding you like to protect the finished cement project from scratching your furniture.
Glue gun or any other adhesive to attach the padding to your project.
Ok here we go.
First, I filled the larger bowel up to 2/3 of its height with cement. Don’t forget to oil the inside of the bowel with vegetable oil or petroleum jelly before you do this.
Next, I inserted the smaller bowel (also oiled, this time on its outer side) and pushed it down so that very little cement was left between the two bases of the bowels.
I wanted to make sure the two bowels are almost touching
each other from the inside, so I added some coins to keep the upper bowel in
place and prevent it from moving upwards.
If you don’t have coins stones or any small heavy object
should do the trick.
24 hours later, I removed the coins. The outer bowel slipped easily off.
I then took a hammer and while holding the bowel in my left
hand a few inches above the table, lightly tapped on the base of the bowel to
help separate the smaller plastic bowel. Try and tap the area where the hammer
is placed here in the picture.
The smaller bowel separated the cement holder was ready. If you
like you can use some sandpaper to sand down the container and give it a more
finished look.
I then took a damp cloth and removed any residue.
The next step is optional- I felt like adding a bit of paint
to my project, so I picked up a bottle of white acrylic paint and painted the
top of the holder.
To prevent the holder from scratching my table, I cut out a
piece of cork and glued it with a glue gun to the base of the holder.
I then placed the cut wine bottle in the center of the holder…and voilà!
I love how it came out…have and go and let me know how yours turned out!
]]>0''admin''<![CDATA[Tea light Candle Holder- Cement Project Number 2]]>https://www.zagadiy.com/?p=4262024-06-29T12:15:10Z2019-11-11T16:01:32ZHere’s a great little project that combines two crafts I love- cement casting and glass cutting. You will need: A glass bottle- I used a blue wine bottle. Follow my…
]]>Here’s a great little project that combines two crafts I love- cement casting and glass cutting.
Cement Tea Light Holder Equipment
You will need:
A glass bottle- I used a blue wine bottle. Follow my instructions for cutting glass here.
Cement. Follow my instructions for making it here.
Round plastic container- make sure the diameter of the container is a bit larger than the diameter of the glass bottle.
Cork/floor protectors or padding to add to bottom part of cement part when ready.
Sandpaper (Optional)
Glue Gun
Tea light
First, I split a blue wine glass into two pieces (follow the example from the previous tutorial).
Next, I cast cement in a round disposable plastic container- I used the same container featured in this tutorial – just follow the instructions, skipping the part where you add the brass. Don’t forget to oil the plastic container before adding the cement!
Here’s what it looks like when ready and removed from the plastic:
You can use sandpaper to refine the edges/ create a smoother texture if you like, I actually just like leaving at is. If you do use sandpaper, remove any residue with a soft cloth (don’t forget to throw out in the garbage and not rinse in the sink as it will clog it).
If you want to make sure the cement doesn’t scratch your furniture, you can cut out a round layer of cork or add floor protectors to the bottom of the cement holder with a glue gun.
]]>0''admin''<![CDATA[Incense Holder- Cement Project Number 1]]>https://www.zagadiy.com/?p=3702024-06-29T12:19:58Z2019-11-04T16:27:27ZOk, so I really love cement crafts. Cement has an industrial feel that’s very modern, and is super versatile. There are so many great ideas on Pinterest for using cement-…
]]>Ok, so I really love cement crafts. Cement has an industrial feel that’s very modern, and is super versatile. There are so many great ideas on Pinterest for using cement- from planters to coasters to tables and more. So, after purchasing a bag at cement at our local home improvement retail store, I decided I’ll start experimenting.
Let’s talk first about making the cement paste. Here’s the equipment you’ll need:
Cement. I like working with grey cement, but there’s also white cement readily available in most stores.
Water.
Pair of disposable gloves.
Respiratory mask.
Protective goggles
Plastic or metal spatula for mixing the concrete mix.
Optional- disposable spoon (also for mixing)
First, I spread large plastic bags on the floor/table to keep my workspace clean. Anything that comes in contact with the cement (including wipes, rags, etc.) needs to be thrown out in garbage bags. Don’t try and rinse anything you use when making cement crafts in your sink- the cement will solidify and clog it! It’s very important you use gloves, eye goggles and a respiratory mask when working with cement, as you’re exposed to dust containing small cement particles, which you don’t want to accumulate in your eyes and lungs.
To make the cement mix, you need to follow the instruction on the cement bag. I like adding water gradually to create a pudding like consistency.
Here’s what the cement looks like when I first start adding water gradually
I don’t usually add sand for small household items I make (I haven’t found it necessary), but again it all depends on the manufacture’s recommendations. If you add too much water and the cement turns to liquid, just re-add more cement until you reach the correct consistency.
Here’s what the cement looks like when it’s ready- pudding like consistency
When the mix is ready, try to work quickly as it tends to solidify (although complete solidification will take 24-48 hours).
Ok, thing you got the hang of things?
Here is the first project I’d like to share with you:
DIY Cement Incense Holder
You will need:
Brass pipe adaptor- I bought one for a couple of dollars at the local hardware store.
Cement.
Round plastic container- any container will do. Be creative! You can choose any shape or size you like.
Oil or petroleum jelly- for oiling the plastic container.
Glue gun+ one glue stick.
Sandpaper.
Optional – blue tack.
If you’re not sure what a brass pipe adaptor looks like, here’s an example-
Here’s what a brass pipe adaptor looks like…there are lots of different sizes, choose one high and wide enough for placing incense sticks inside.
First, prepare the cement (instruction at the beginning of the post).
Using a hot glue gun, glue closed the narrower side of the pipe adaptor- so that it’s sealed and won’t allow cement to leak through.
Glue sealing one side of the brass pipe adaptor
Next, spread either oil (any cooking oil will do) or petroleum jelly in the plastic container of your choice, and add cement paste to the container until a 1-2 cm/0.5 inch layer is created. Place the pipe adaptor in the cement filled container with the glued part downwards – either position it on the side or in the center of the container.
Plastic container with cement and brass pipe adaptor
24 to 48 hours later, remove the cement holder you created from the plastic container (it should slip out easily).
Cement Incense holder
Take a small piece of sandpaper and sand the cement, careful not to sand the brass (as it may scratch it).
Gently sanding the incense holder
To make sure your holder doesn’t scratch or damage household furniture, you can glue some cork (cut from a cork sheet, found at local craft stores/dollar stores) or stick a few floor protecters on the bottom side of the holder.
And that’s it! If you’d like better control of the direction of the incense sticks, just add a bit of blu tack at the bottom of the pipe adaptor (where the hot glue was placed originally).
]]>0''admin''<![CDATA[AliExpress Shopping Tips]]>https://www.zagadiy.com/?p=3482024-06-29T12:30:08Z2019-10-26T15:22:45ZAs far as online shopping goes, AliExpress has been a game changer. There’s nothing you can’t find on this online mega-store, which offers merchandise from sellers all over China. Over…
]]>As far as online shopping goes, AliExpress has been a game changer. There’s nothing you can’t find on this online mega-store, which offers merchandise from sellers all over China. Over the last five or six years, I’ve ordered a lot of different products from this online platform, with varying degrees of success. At first, I tried ordering apparel items, but a few dresses, shawls and T-shirt’s later, realized it was hard to tell from the online images the quality and fitting of the actual piece when it arrived. And although AliExpress does offer a return policy, By the time you pay for the return of your package to China (return shipping costs are not included in the return policy, at least from Israel), you end up paying more than the item’s original cost. I later tried ordering electronics (USB cables, electronic adaptors, home decor (felt like hit or miss, some products we’re lovely and some were awful and cheaply made) and kitchen gadgets with varying degrees of success. Over time, I developed a systematic method for purchasing items on the site, and today most of the items I purchase (I buy nearly all my craft supplies on Ali) end up being pretty spot on, with very few surprises and disappointments. Therefore, I’d like to share a few tips that will help improve your overall shopping experience.
Tip number 1:New to shopping on AliExpress? You should read this.
Tip number 2: Hunting for a particular item? Overwhelmed by all the options on site? Here’s what I learnt about changing the AliExpress platform search filters.
Let’s say you’re looking to purchase a USB drive. If you search on AliExpress for USB drive, they’ll be endless options to choose from. What I like to do, is change the default filter option on the left side of the screen from “Best Match” to “Orders” and tick the “4 and up” stars option.
Changing the filter options
If you’re wondering why
it’s important to choose these filter options, the reason is that the sale volume
reflects the “attractiveness” of an item and its seller. When I first started
purchasing items on AliExpress, I usually sorted the item list with the “Price”
filter, choosing to purchase the least expensive item. After a while I realized
this wasn’t a good method, because sellers who don’t have a large sales volume
will often offer a slightly lower price on an item, but may take forever to
deliver it (one of the seller’s didn’t even have the item in the inventory) or
cause difficulties when wanting to return it. The bottom line is that the more customers
ordered a certain item and gave it a 4+ review, the higher the chance that it
will be a quality product that you’ll enjoy. Peer reviews are very important
and informative on this platform, especially when reviewers add photographs of
the purchased items. You’re better off paying $2-$3 dollars more, for the peace
of mind that the product will meet its online description.
Decided on an item you like? Great. Just don’t forget to take a peek at the customer’s satisfaction from the store before you order. All you need to do is hover your mouse above the name of the store on the product page, and you’ll be able to see the seller ratings, plus how long the store has been opened on AliExpress. As a rule of thumb, I’d try and buy only from stores with a 4.5+ seller rating, which has been open for at least 6 months.
Chose this product? Have a look at the store review before purchasingStore review
Tip number 3: Choosing the right shipping method for your needs.
When I first started ordering
items from AliExpress, I wasn’t very selective in choosing a shipping method. I
usually just went with the default option offered by the seller. All this
changed when I discovered the option of epacket.
ePacket delivery is a
shipping option offered by merchants in China and Hong Kong. It’s an agreement
between the US Postal Service (USPS) and Hong Kong Post, allowing for faster delivery
of products coming from China and Hong Kong to a number of different countries.
You can use ePacket to send small packages weighing up to 2 kg (4.4 lbs) and a
total value of $400. Some sellers offer ePacket delivery for free, but even
when it’s not, you’ll be paying up to $3-$4 dollars more for a significantly faster
delivery experience (here in Israel, some packages arrive within one week!). The longest I’ve had to wait for an ePacket to
arrive has been about two weeks. It’s a great way to order from China, without having
to wait 4-6 weeks for your packet to arrive with the traditional delivery
options (such as China Post Registered Air Mail, China Post Ordinary Small
Packet Plus, etc). ePacket packages can be tracked here.
I hope my experience’s help you with your future purchases…Happy shopping!